


 Image
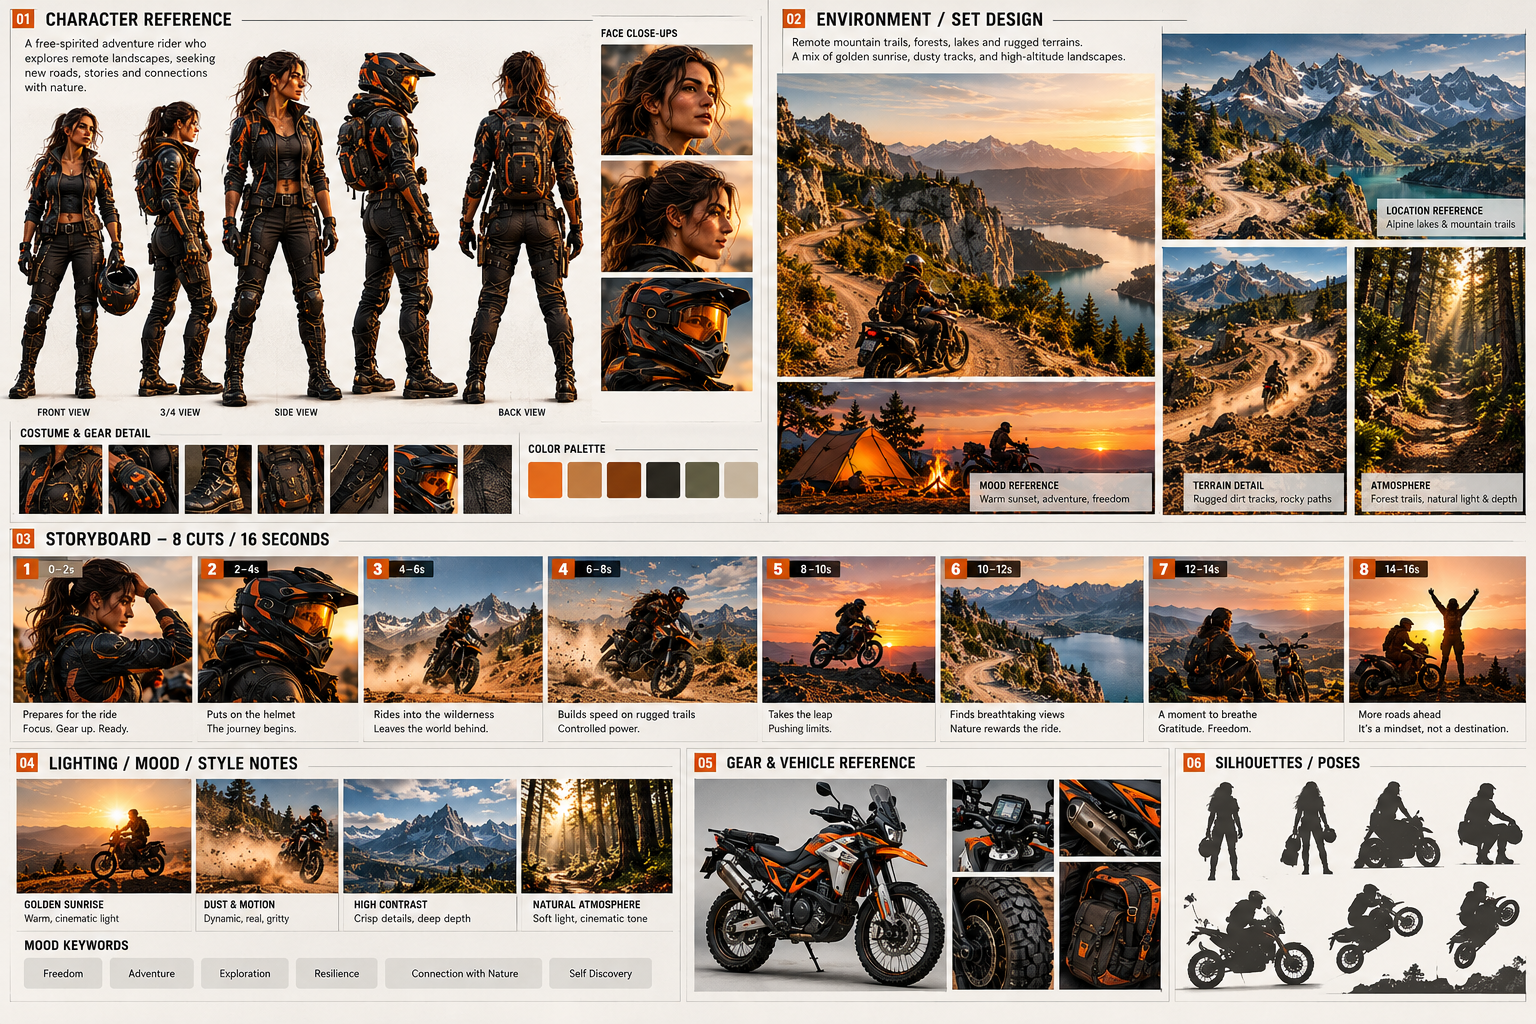
Character sheet
StoryForge — Cinematic Character & Storyboard Blueprint
StoryForge transforms a creative concept into a comprehensive visual production blueprint for AI filmmaking, animation, cinematic advertising, and storytelling. It combines consistent character references, costume and prop breakdowns, environment studies, storyboard sequences, camera framing, lighting references, color palettes, and emotional beats in one organized visual board. Customize the character, setting, activity, visual style, and story to create original concepts ready for image generation, image-to-video workflows, and pre-production planning.
Create a highly detailed, professional cinematic production-planning board for an original film, animation, commercial, music video, game cinematic, or AI-generated video concept.
The final image must function as a unified visual reference document that establishes the main character, environment, props, visual style, and a coherent sequence of shots. It should resemble a carefully art-directed film pre-production board, combining photorealistic or stylized cinematic imagery with clean editorial organization, concise labels, and practical filmmaking details.
All content must adapt intelligently to the user-provided inputs below.
1. Creative Inputs
Use the following variables to define the project:
PROJECT TITLE: [PROJECT_TITLE]
PROJECT TYPE: [PROJECT_TYPE]
MAIN CHARACTER: [MAIN_CHARACTER]
CHARACTER APPEARANCE: [CHARACTER_APPEARANCE]
CHARACTER ETHNICITY / CULTURAL BACKGROUND: [CHARACTER_BACKGROUND]
WARDROBE / COSTUME: [WARDROBE]
SIGNATURE PROPS: [PROPS]
VEHICLE / EQUIPMENT: [VEHICLE_OR_EQUIPMENT]
ENVIRONMENT / LOCATION: [ENVIRONMENT]
MAIN ACTION: [MAIN_ACTION]
STORY SUMMARY: [STORY_SUMMARY]
EMOTIONAL ARC: [EMOTIONAL_ARC]
VISUAL STYLE: [VISUAL_STYLE]
COLOR PALETTE: [COLOR_PALETTE]
LIGHTING STYLE: [LIGHTING_STYLE]
CAMERA STYLE: [CAMERA_STYLE]
MOOD KEYWORDS: [MOOD_KEYWORDS]
NUMBER OF STORYBOARD SHOTS: [SHOT_COUNT]
VIDEO DURATION: [VIDEO_DURATION]
ASPECT RATIO: [ASPECT_RATIO]
TEXT LANGUAGE: [TEXT_LANGUAGE]
When an input is blank, infer a coherent choice from the other inputs. Do not insert visible placeholder text or square-bracket variables into the finished artwork.
2. Overall Art Direction
Design a sophisticated visual board that combines cinematic photography, production-design references, character sheets, and storyboard planning.
Use a structured but visually engaging editorial layout. Avoid simply copying a standard grid: vary panel sizes according to their importance, with a dominant character reference, larger environment images, a horizontal storyboard sequence, and smaller technical detail panels.
Use thin dividers, subtle panel backgrounds, restrained section numbering, compact labels, and consistent spacing. Every panel should contribute useful information to the production concept.
Choose typography, backgrounds, borders, and graphic accents that complement the selected visual style. The result must feel designed specifically for this project rather than like a generic template with different pictures inserted.
3. Shared Creative Specifications
At the top of the board, include a concise production summary containing:
Project title and concept.
Main character or subject.
Selected color palette.
Environment fingerprint: the defining visual characteristics of the location.
Lighting and atmosphere.
Storyboard shot count and total duration.
Ensure these specifications remain consistent across all sections. The character's appearance, costume, equipment, location, time of day, weather, and lighting should not change arbitrarily between shots.
4. Character Reference Section
Create a prominent character-reference area containing four complementary views:
Primary view: A clear full-body view establishing the character's complete silhouette and costume.
Three-quarter view: A natural pose revealing the face, body proportions, and costume construction.
Rear or side view: A view showing backpack, hair, cape, equipment, garment construction, or other relevant details.
Face close-up: A detailed portrait establishing the character's identity, expression, skin or surface texture, and defining features.
Add smaller costume or equipment close-ups where appropriate.
The same character must appear in every view. Preserve facial identity, hairstyle, body proportions, clothing, accessories, and distinctive markings.
For non-human characters, adapt these views to the creature's anatomy, materials, proportions, and signature features.
5. Environment and Set Design
Create a dedicated environment-reference section with three or four images:
Location reference: A wide establishing view showing the geography, architecture, terrain, and major visual landmarks.
Mood reference: A cinematic image establishing the desired atmosphere, weather, time of day, and emotional tone.
Action environment: A view of the location during the main action.
Spatial layout: A simplified overhead plan or environmental layout showing the action area, important objects, character positions, and possible camera placements.
Adapt these panels to the project. A city story might use streets and rooftops; a fantasy film might use ruins and enchanted forests; a product commercial might use a studio or lifestyle setting.
Avoid irrelevant scenery, generic landmarks, or locations that contradict the creative brief.
6. Storyboard Sequence
Generate exactly [SHOT_COUNT] distinct storyboard frames that together communicate a complete visual sequence lasting approximately [VIDEO_DURATION].
Arrange the frames in a clear horizontal strip or a visually connected sequence of panels. Number every shot and include a concise time range.
For each frame, display:
Shot number and time range.
Camera framing.
Camera angle or movement.
Main character action.
Key visual event.
Short direction or narrative beat.
Build a coherent progression from opening to conclusion. Unless the brief specifies another structure, use this sequence:
Establish: Introduce the setting and atmosphere.
Introduce: Reveal the character or main subject.
Prepare: Show the character getting ready or approaching the task.
Initiate: Begin the main action.
Develop: Show the action gaining momentum.
Escalate: Introduce the most visually significant movement or challenge.
Peak: Deliver the defining visual moment.
Resolve: Show the immediate result.
React: Capture the emotional response or consequence.
Close: End with a memorable final composition.
Adapt the number and purpose of shots to [SHOT_COUNT]. Do not force all ten beats into a shorter sequence. Every frame should depict a different moment rather than repeating the same pose.
If the project is a product advertisement, replace story beats with product-reveal, demonstration, detail, benefit, and final hero shots. If it is a dialogue scene, emphasize performance, reactions, and shot-reverse-shot continuity.
7. Camera and Cinematography Details
Use a deliberate variety of cinematic framing, selected to suit each shot:
Wide establishing shot.
Full-body or long shot.
Medium shot.
Close-up.
Extreme close-up.
Low-angle or high-angle shot.
Over-the-shoulder shot.
Tracking shot.
Point-of-view shot.
Dynamic action shot.
Include concise, useful camera notes where appropriate, such as lens character, camera movement, focus depth, composition, or subject placement.
Do not use every shot type mechanically. Select only those that support the story.
Keep screen direction, spatial relationships, and character movement consistent across consecutive frames.
8. Lighting, Mood and Style Notes
Create a separate visual reference area with three or four supporting images showing the selected lighting and atmosphere.
Include examples such as:
Key-light direction and quality.
Warm or cool ambient illumination.
Contrast and shadow depth.
Atmospheric effects such as fog, dust, rain, smoke, or floating particles.
Time-of-day variations, if required by the story.
Display a compact set of mood keywords drawn from [MOOD_KEYWORDS].
Use [COLOR_PALETTE] consistently across the character, environment, props, and storyboard. If the project has a defined color script, show how the colors evolve with the emotional arc without changing the character's identity.
9. Costume, Props and Equipment Reference
Create a technical detail section featuring the most important objects from [PROPS] and [VEHICLE_OR_EQUIPMENT].
Include close-ups of relevant components, materials, textures, controls, fasteners, accessories, surface finishes, and functional details.
When a vehicle is present, show useful reference views such as side profile, front view, rear view, and selected mechanical details.
When a costume is central to the story, show fabric, armor, footwear, fastenings, accessories, and distinctive design elements.
Only include details relevant to the project. Do not invent additional branded products, unnecessary weapons, or distracting props.
10. Silhouette and Action Studies
Include a compact strip of silhouette studies or pose references.
Show how the character reads from a distance and how their body language changes during the main action. Use a mixture of standing, moving, interacting, and resting poses as appropriate.
For vehicles, creatures, or mechanical subjects, adapt this area into movement profiles, posture studies, mechanical poses, or equipment silhouettes.
Preserve recognizable proportions and costume details across all variations.
11. Typography and Frame Annotations
Use clean, professional typography with a strong hierarchy:
Project title: prominent but restrained.
Section titles: compact uppercase lettering.
Shot numbers: highly legible.
Captions: short and practical.
Technical notes: concise and readable.
Mood keywords: small, consistent tags.
Use [TEXT_LANGUAGE] for all visible text.
Write meaningful captions derived from the actual scene. Avoid gibberish, invented technical specifications, unnecessary decorative copy, and repeated generic descriptions.
If exact typography cannot be rendered reliably, prioritize the visual references and use minimal text rather than filling the board with illegible characters.
12. Production Consistency Rules
The entire board must represent one coherent production concept.
Preserve the main character's identity and visual design.
Maintain costume and prop continuity.
Keep the location recognizable across storyboard frames.
Ensure the lighting and color grading follow the chosen visual direction.
Make every storyboard image correspond to the written action.
Use a different composition for each shot.
Do not introduce unexplained characters or objects.
Keep technical diagrams and cinematic photographs visually distinct.
Prioritize readability and practical production value over decorative complexity.
13. Final Output Requirements
Generate one complete, high-resolution production board in [ASPECT_RATIO].
The finished image should be suitable for use as a visual planning reference for AI image generation, image-to-video generation, animation, commercial production, game cinematics, or short-film pre-production.
The final board must communicate the character, environment, story progression, cinematography, lighting, and visual identity at a glance.
Negative constraints: No copied layouts or branded designs, no unrelated imagery, no inconsistent character identities, no changing costumes without narrative justification, no contradictory environments, no duplicated storyboard moments, no illegible walls of text, no random logos, no watermarks, and no unnecessary decorative clutter.